Sunday, November 28, 2010

Equipped

Following a trip to the Harrogate Kinit and Stitch Show I am now better equipped to make my Eggplant themed quilt. Felt, scrim, beads, abacca tissue both thick and thin, wire, throwsters waste a silk cocoon or two and a dleightfully named 'Happy Bag' of thread.

I already have an idea. I tried to tell Dennis about it over a meal at Pizza Express. He finds it hard  to visualise things from a verbal description only so I  demonstrated with the paper napkin and the table decoration.
Apparently, it didn't help.

Saturday, November 20, 2010

Twelve by Twelve: The BOOK - 100 Days and counting

Those of you who read the blog directly, rather than by e-mail subscription or RSS feed, may have noticed the counter widget in the sidebar steadily ticking down the days until the release of our forthcoming book  Twelve by Twelve: The International Art Quilt Challenge in March 2011 - that's only 100 days or so away!

In the meantime, remember the book is now AVAILABLE FOR PRE-ORDER from suppliers such as Barnes & Noble, Amazon and the Book Depository. Treat yourself or put it on your gift list!


Twelve by Twelve:The BOOK!  

Wednesday, November 17, 2010

Eggplanty Plants

I was thinking that there weren't many things around in the eggplant palette.  Then I opened my eyes and went for a walk:

Sunday, November 14, 2010

Don't Cry!

How sad is it that dinner preparations are delayed so that you can take a photo of an onion that somewhat fits the current "Eggplant" colourplay palette?

Tuesday, November 9, 2010

In Real Life!

Two Twelves!

Kristin and I had such a wonderful time at the International Quilt Festival in Houston this past weekend.

We did some actual 12x12 business in preparing for the upcoming book release and future exhibitions, but we also spent tons of time just chatting, looking at quilts, talking about creative development, challenges, balance, etc. -- all the big and little ideas that like-minded friends share. It was wonderful. It's been said before, but it's so true: all the friendships we have developed through the 12x12 project are pretty amazing.

Thursday, November 4, 2010


I went googling for the colors Niki has given us. I needed a reference and thought I would share it here.

I took this photo yesterday at the Japanese Garden. It is pretty close to the colors.


I think this palette suits the season we are in, don't you?

Personally I Like Purple and Green


Here's a sneak peak my next challenge piece.  I'm finished!

Just kidding.

Amazingly enough, just when Nikki has announced the eggplant/wine/emerald color palette for the next challenge, this is the quilt I am working on.  I started it as a way to play with my very first screen prints from a printing session this summer, and it's far bigger than 12x12.  Although now that I know the palette, maybe I'll work a bit more with these prints.  Hmmmm.   But anyway, as this is certainly not my usual color range, this seemed strangely synchronistic.

I asked Miss C what she thought of the piece in progress.  She gazed at it thoughtfully.  "Purple and green together make me feel nauseated," she said, "and those splotches in that fabric look a bit vomity so that doesn't help ... "  She paused again, then added brightly, "But I like the shapes!" 

It's always good to get an honest critique. 

Undaunted, I am continuing with the machine quilting today. 

Wednesday, November 3, 2010

The Colourway Collection So Far

The Twelve by Twelve website has now been updated to showcase the Rusty Colorplay challenge quilts. In addition to checking out the Artist Colorplay Gallery pages for each Twelve, it is instructive to review the Colorplay mosaics so far as we reach the midpoint in this series:
Pink Colourplay   Blue White Black Colourplay
  Pink                                  BlueWhiteBlack
Kilauea Colourplay  Yellow Purple Colourplay
Kilauea                            PurpleYellow
Lorikeet Colourplay   Rusty Colourplay
Lorikeet                                Rusty

I have found that the inspiration and design process is quite different when a colour or palette is your springboard rather than a theme word. As Diane mentioned in her rusty reveal post, a theme word was useful in narrowing down the options and providing focus.  Fortunately we all revel in colour so this new series is keeping us engaged and challenged.

Tuesday, November 2, 2010

Eggplant, Wine and Emerald


Delicious eggplant, rich wine and sparkling emeralds. Okay, maybe you need to use your imagination with my photo, but you get the idea. Our next palette includes deep purple, burgundy red and dark green -- all my favorite colors.

Monday, November 1, 2010

Rusty Mosaic

Here's a preliminary snapshot, in case you're wondering how our Rusty pieces look all together:

Rusty Sawblade


This one snuck up on me. I had ideas. I let them simmer. I pondered fabrics. I felt good about it all. I had time.

And then I didn't! The last few days have been a marathon of stitching and beading. But, here it is, pretty much as I had envisioned it two weeks ago.

In keeping with my self-imposed theme of traditional blocks, I based this on a sawtooth border. It looks more like a star, but just know that in my mind these are concentric sawtooth borders. In my mind it's also an abstract circular saw blade that's been hanging on a pegboard in an old shed for way too long and has clumps of rust all over it.


I enjoyed playing with all the bumpy circular elements of the fabric, the french knots, the covered rings, and the beads. I do enjoy piling on the threads and the beads, so even if this is not the most cohesive composition I've ever come up with, and although I would have preferred to have worked more leisurely, I thoroughly enjoyed the process.

Patricia Tina

Patricia Tina. Known as Pat.

Inspired by:

* Trinny and Sussanah and their "Sex Bomb" episode - a glorious romp with mutton dressed as lamb

* My friend, Vicki, describing blue or green eyeshadow as "mouldy eyelids"

* My husband's great aunt - a wild and wonderful woman who never stopped dying her hair an extraordinary and rather alarming shade of orange. She remains an inspiration.

* my first ever viewing of "Mame" last Sunday.

Definitely NOT inspired by any of my red-headed friends, including our luscious ginger Twelves!

Terra Incognita

Terra Incognita, the unknown land. My wonderful husband helped me with the name of this quilt because I really didn't know what to say about it. As I look at it nothing comes to me. Therefore, I thought the name fit perfectly. It is a land I don't know. This color scheme proved to be a real challenge for me. I admit it, despite talk about orange growing on me, I really don't like rusty orange. If forced to pick, I'd rather be surrounded by pepto pink. I'm never going to be an earth tone girl. There it's out. I accept it.

To make the quilt, I once again quilted and painted fabric. I then sewed the strips together in a log cabin pattern with copper thread and arranged the blocks in a diamond pattern. The edges are finished with copper tape.

Autumn Leaves

Rust made me think of autumn leaves. That's why I chose several of my leaves photos as the starting point for the quilt. Mainly a picture of a pond in Japan, where I really liked the way the leaves were floating on the water.
I had to do several dyeing sessions to get the colour shades I really wanted to have. I also collected many fallen leaves during my walks, to find the right shape for the three leaves.
I did all the stitching by machine except for the few detached chain stitches.
This was a pleasant challenge to work on, pretty stress-free, although I've only put the last stitches on this morning. Thank you Terri!
I've posted some close-up pictures on my blog.

Rusty Square Dance


This piece was fun and a lot of work. I started by rusting the turquoise silk and I discharged and added turquoise Dynaflow paint to the rust colored silk. I sandwiched each of the fabrics with a thin batting and backing and quilted them.

I played around with some scraps of fabric to figure out what size squares would fit into a twelve in square piece. I ended up cutting 1 and 3/4 inch squares. Stitching these is not as simple as it looks. You can read more about it on my blog.

Here is a detail shot. I found a 12 inch copper rod at the hardware store which I sanded with steel wool. I then soaked it overnight in Windex with ammonia to get the patina.


October's End


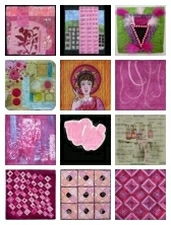
Heading into this piece, I was reminded why we call this a "challenge!"  I'm discovering that I'm finding these color challenges harder than our first round of challenges, I think because I'm a word person.  Having a color palette to start with, without any more direction than that, really does leave things so wide open for me that I have a hard time settling.  Because I can be so literal with words, I LIKE that this pushes me away from that ... but so far, with each color challenge, I've had to fight the urge to think of something (a word) that can then translate into the colors.  This is really stretching me, which is a GOOD thing.  A really good thing.  But along the way, I must confess to feeling some stress around that stretching!

This is the first time in all of our challenges that I have completed two pieces.  This one, my favorite of the two, was the second one I started.  (You can see the other on 
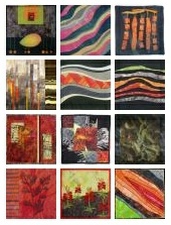
my blog.)  I began with a gorgeous piece of fabric dyed by Judy Robertson of Just Imagination, and with a shiver of fear, I cut smack into the middle of it to get a piece with the striation layers I wanted.  The overlaid circles, mostly cotton but some silk duppioni, are fused on.

I've struggled with this.  I tried some hand stitching, then ripped it out.  I tried adding some seed beads, then pulled them off.  I can't shake the sense of it not being finished, but everything I've tried to add seems to take away from it.  (I keep hearing Tim Gunn's voice:  "Edit wisely!")  So, I've decided,that means it's done.  Maybe what I'm reacting to is that this doesn't have a high amount of contrast -- and yet that's what I like about this, too.

I really enjoyed the quilting process.  And I was delighted that I was able to use the stitch regulator on my new machine for the first time, while I stitched those small circles.  Up until this piece, I'd only done practice doodling with the stitch regulator function, finding it slow and awkward compared to my usual free motion quilting.  This small quilting design was just the sort of application that makes the stitch regulator useful to me, I think.  So that made me happy.  Here's a detail of quilt:


I think that this might be a piece I'll really like after I've put it away for a month or so, and then pull it out again.  Funny how some pieces are like that!

Spaza shop


When this 'rusty' pallate was first announced I was amused ( and please, no one take offence at this) that the first reaction of some of my colleages was to deliberately make things rusty. We live in a society in which rusty things are play things for us - cast offs that we can use to experiment with and make something beautiful with. Of course such creative recyclying is a very good thing. But all I could think of (and maybe this is my house renovation preoccupation again) was that many people have to live under rusty corrogated iron and be grateful for its shelter. Every rusty mail is put to construction use.

I have long had a South African fettish and all I could think about was the jumble ofTownship shacks - often rusty, almost always painted brightly and decorated with whatever is to hand - the lables off food tins are a common substitute for wall paper. Its the same thing - creative recycling but with necessity underlying it.

This quilt was made at the Bishops ranch retreat in Healdsburg where I had the priveledge of spending time with Diane and 43 other quilters. I already knew I was going to do a rusty shack and one evening spread all the goodies on the theme I had packed so they were ready the next day. I sat and mused a while and told Diane I was going to do the door to a sangoma's (traditional healer's) shack. But, when I came in the next morning and looked at them again they said, "Spaza shop".

A spaza shop is a South African shop run from the home of someone living in one of the townships. There are over 100,000 of them and each one financially supports an average of four family members. They sell the basic commodities and were especially important in apartheid when they were often the only shops available in the black residential areas.

I went to the kitchen trash can and pulled out some new quilting materials. Diane - who had kindly loaned me her Bernina - looked at them curiously, then, with a hint of fear in her voice asked casually, "Are you going to stitch those?"
"Yes," I replied, "but not with your Bernina."
The relief on her face was obvious!


A little shelf of goods to buy


I do think that the photographs lose some of the texture of this quilt. I made it by roughly sewing ripped strips of African resist dyed fabric and strips of bark cloth to get the higgeldy-piggeldy look and texture of a 'self-build with waste materials'. I deliberately left the scrim rough to illustrate decay and peeling paint. The beads are recycled glass again made in Africa.


You can see a photo of a real Spaza store illustrating this interesting article about poverty tourism.

On a lighter note, it was in a Spaza shop en route to Swaziland in 1990 that I discovered the delights of bacon and banana toasted sandwiches!

P'Tina


As you probably already know, I very much enjoy including cats in my art. I love cats and they are a great source of inspiration for me. And I also had a sudden awareness that I haven't created a quilt this round yet with a cat on it.

I've been having a lot of fun recently painting some fun kitty characters and had wanted to do one in fabric. This was the perfect time to do that.


This quilt was made with fused, raw-edge appliqué and free motion quilting. I also added touches of paint for shading and highlighting.

Autumn Patina

I was so inspired by this color challenge that I got started right away and had it finished more than a month ago. These are truly my colors.

I love Autumn and with the season and all the inspiration around me it became the theme I decided to work with. I decided recently that I need to challenge myself to try some different techniques and this presented a good opportunity to paint fabric; add hand-stitching; include a found object; and let the process create the form the piece took, creating its irregular outline.

The leaf is a real leaf that I had picked up last fall and pressed in a book. I came across it the very day the color challenge was announced and I knew that I wanted to use it. The rich, rusty color seemed just right. The challenge was how to stabilize it well enough to attach it. In its pressed form it was very delicate and brittle. I started by fusing fabric to the back side, which strengthened it considerably, but I could still see that if it bent, even a little, the leaf would crack. I ended up gluing it to a piece of illustration board and carefully cutting it around the outline of the leaf, with a craft knife, after the glue was dry.

I really enjoyed painting the two fabrics, using a small sea sponge to do most of the mottling of acrylic fabric paints, including a bronze metallic paint. Since I can hardly bear to not have any patterned fabric in my work, I used one of my hand-carved stamps to add some very subtle pattern to the patina fabric. I liked the way the fabrics looked as I stacked them up and so I worked out a composition using that idea. I had found some hand-dyed floss in the patina colors, so I added a scattering of little stitches across the background, then glued my stabilized leaf in place.

This detail, taken at an angle, reveals that the "stacked" background fabrics are actually quite flat. The trompe l'oeil effect of shadow and raised surface was done with paint. The leaf, on the other hand, does actually protrude about 1/8th inch because of its illustration board backing.

This really is one of my very favorite 12 x 12 pieces at this point. It was an exercise in problem solving and the colors were a joy to use.

Both photos should be clickable for a closer view.

Blue Moon

I was happy when I saw the color choices Terri picked for this challenge, mainly because I love rust colored things.  I have lots of fabric I've rusted over the years, and I was able to go to my stash to find what I needed.


This piece was made using some fabric I rusted with some sort of grating I found somewhere. I used  that for the top, and some large rusted washers for the bottom piece.  I had previously dyed some of the rust fabric this aqua blue color,  and I had a sheer I had rusted along with the washers.
I originally made something else for this challenge, but I think it's too busy, so this was my second attempt. I've posted that on my blog  http://www.fiberartmusings.blogspot.com/  There's no particular message to this piece, I just like the way it came together, and after it was done I saw the moon.

Garden Gate

In working on these color themes, I find I go one of two ways: I can make a small art quilt that is simply about diving deep into the colors, or I can make an art quilt that is about some kind of idea or image and use the colors as the vehicle for the idea.

I suppose, my Yellow Ladder quilt is the only one for our ColorPlay series that is more about the image than the colors, but that's still the initial decision I have to make at the beginning of my process.
Garden Gate

This quilt is about the colors -- and the variety of fabrics. I would never stumble upon this color palette if I were just thumbing through my fabrics in preparation for a new piece. And yet, I am stunned by how much I like it. And by how many fabrics I had to choose from. And by how often it jumps out at me in nature and other day-to-day visuals (now that I am more aware).

I began with a piece of muslin that I rust dyed with a group of fiber artists in Texas. I must have used some kind of rusty grate that created that diamond pattern. Then I pulled from the fabrics I pre-selected and leaned on my shrine-style composition. I wish I could have fit in more of the fabrics. I had lots of interesting options, but I always try to achieve a bit a simplicity and spareness to allow for additional interest with embroidery and embellishments. (Maybe I'll have to make a larger version that would accommodate more fabrics.)

I wish I would have made some different choices up at the very top. I think those two plain teal fabrics at the top are dull and clunky. Maybe some stitching or embellishments would have helped, but I ran out of steam at the end and felt I needed to finish and move on. (Do you know this feeling?)

I've been exploring creating sheer overlay silhouettes with tulle. I chose crocuses for this piece. I really like the contrast of the linear composition with the organic flower shape. My little Y-shaped flowers trail across to emphasis the idea of a garden or a field.


An old rusty key seems so predictable. Maybe too cliche, but I think it works. I also like the contrast of the grittiness with the fancy, metallic fabrics.

I had a tough time coming up with a title, but the key and the lines in the rust-dyed fabric make me think of old gates or fences and the plant images are somewhat like what you might find in a garden. I also like the idea of the different blocks of fabric as plots for growing different things. Maybe fruits and flowers, maybe ideas and inspiration.

A Lasting Impression

As sometimes happens in these Colourplay challenges, within hours of announcement of the challenge palette, I was presented with an inspiration image. A television program touched upon the refurbishment of Sydney Town Hall including its splendid Victorian copper-pressed ceilings.   It made a lasting impression - the colours were in the ballpark and I was intrigued by the decoration.  Then I headed off to New Zealand for a couple of weeks to accompany the Twelve by Twelve exhibition.  I admired many pressed metal ceilings in New Zealand but wasn't sure that I could capture the intricacies of the patterns using my piecing techniques.  Besides I was travelling and did not have access to a sewing machine.

Then in Wellington I came across Yvette Stanton's new book The Right Handed Embroider's Companion (there's a left handed version too).  What serendipity!  I could use this travel time to expand my stitching vocabulary and make my own version of a pressed metal ceiling.

A Lasting Impression by Brenda Gael Smith

I enjoyed the stitching process - the wool felt was like butter!  I stitched the teal centre panel first and appliqued it onto the rusty background using armenian edging stitch, taking the opportunity insert some batting in between the layers at the same time.

It's a departure from my usual style and, in keeping with my embroidery experience level, is a bit naive but I like the penny rug quality. As I worked on this piece, my husband frequently expressed concern that it "isn't a quilt" and that I may be expelled from the group! I don't think there is any danger of that but I do have a back up piece if required.  It started out as writing in flour paste like this:

And ended up like this: